(Adding and standardizing/clarifying references. So, I guess...Happy birthday, Eiji...? :\) Tag: rte-source |
(Table cleanup.) Tag: rte-source |
||
| Line 40: | Line 40: | ||
===Known Bosses=== |
===Known Bosses=== |
||
| − | {| class=" |
+ | {| class="wikitable sortable" width="100%" style="background:transparent;" cellpadding="0" cellspacing="0" |
| − | ! |
+ | ! width="30%" style="background:{{Themecolor}}; color:#FFFFFF;" |Boss Name |
| − | ! |
+ | ! width="30%" style="background:{{Themecolor}}; color:#FFFFFF;" |Floor |
| − | ! |
+ | ! width="35%" style="background:{{Themecolor}}; color:#FFFFFF;" |Other Details |
| + | ! width="5%" style="background:{{Themecolor}}; color:#FFFFFF;" |Ref |
||
|- |
|- |
||
| − | | |
+ | | align="center"|«[[The Fatal Scythe]]» |
| − | | |
+ | | align="center"|1<sup>st</sup> Floor (Bonus) |
| − | | |
+ | | align="center"|Boss Monster of the [[Black Iron Palace]] [[Hidden Dungeon|Hidden Bonus Dungeon]] |
| + | | align="center"|<ref name = V2MDGP3/> |
||
|- |
|- |
||
| − | | |
+ | | align="center"|«[[Illfang the Kobold Lord]]» |
| + | | align="center"|1<sup>st</sup> Floor |
||
| ⚫ | |||
| − | | |
+ | | align="center"| |
| ⚫ | |||
|- |
|- |
||
| − | | |
+ | | align="center"|«[[Nato the Colonel Taurus]]» |
| + | | align="center"|2<sup>nd</sup> Floor |
||
| ⚫ | |||
| − | | |
+ | | align="center"|Mid-boss |
| ⚫ | |||
|- |
|- |
||
| − | | |
+ | | align="center"|«[[Baran the General Taurus]]» |
| − | | |
+ | | align="center"|2<sup>nd</sup> Floor |
| − | | |
+ | | align="center"|Closed Beta Floor Boss<br />Mid-boss in the official release |
| + | | align="center"|<ref name = PV1RondoP12/> |
||
|- |
|- |
||
| − | | |
+ | | align="center"|«[[Asterius the Taurus King]]» |
| − | | |
+ | | align="center"|2<sup>nd</sup> Floor |
| − | | |
+ | | align="center"|Floor Boss in the official release |
| + | | align="center"|<ref name = PV1RondoP12/> |
||
|- |
|- |
||
| − | | |
+ | | align="center"|«[[Bullbous Bow]]» |
| − | | |
+ | | align="center"|2<sup>nd</sup> Floor (Field) |
| − | | |
+ | | align="center"|A Field Boss of the 2<sup>nd</sup> Floor. |
| ⚫ | |||
|- |
|- |
||
| + | | align="center"|«[[Nephila Regina]]» |
||
| ⚫ | |||
| − | | |
+ | | align="center"|3<sup>rd</sup> Floor (Quest, Dungeon) |
| − | | |
+ | | align="center"|One of the Flag Mobs for the 3<sup>rd</sup> Floor portion of the first campaign quest in SAO, as well as the dungeon boss of the Queen Spiders Nest. |
| ⚫ | |||
|- |
|- |
||
| − | | |
+ | | align="center"|«Fallen Elven Commander»{{NoteTag|The name was Fallen Elf Commander in both the web and published versions of Concerto of Black and White, but the name was changed in Kirito's recollection in [[Barcarolle of Froth|Progressive Volume 3, Barcarolle of Froth, Part 5]]}} |
| − | | |
+ | | align="center"|3<sup>rd</sup> Floor (Quest, Dungeon) |
| − | | |
+ | | align="center"|One of the Flag Mobs for the 3rd Floor portion of the first campaign quest in SAO. |
| + | | align="center"|<ref name = PV2ConcertoP9>[[Concerto of Black and White|Progressive Volume 2, Concerto of Black and White, Part 9]]</ref> |
||
|- |
|- |
||
| − | | |
+ | | align="center"|«Nerius the Evil Treant» |
| − | | |
+ | | align="center"|3<sup>rd</sup> Floor |
| − | | |
+ | | align="center"|Floor Boss |
| + | | align="center"|<ref name = PV2ConcertoP9/> |
||
|- |
|- |
||
| − | | |
+ | | align="center"|«[[Biceps Archelon]]» |
| − | | |
+ | | align="center"|4<sup>th</sup> Floor |
| − | | |
+ | | align="center"|Field Boss |
| + | | align="center"|<ref name = PV3BarcarolleP6>[[Barcarolle of Froth|Progressive Volume 3, Barcarolle of Froth, Part 6]]</ref> |
||
|- |
|- |
||
| − | | |
+ | | align="center"|«Wythege the Hippocampus» |
| − | | |
+ | | align="center"|4<sup>th</sup> Floor |
| − | | |
+ | | align="center"|Floor Boss |
| + | | align="center"|<ref name = PV3BarcarolleP8>[[Barcarolle of Froth|Progressive Volume 3, Barcarolle of Froth, Part 8]]</ref> |
||
|- |
|- |
||
| − | | |
+ | | align="center"|«Fuscus the Vacant Colossus» |
| + | | align="center"|5<sup>th</sup> Floor |
||
| ⚫ | |||
| − | | |
+ | | align="center"|Floor Boss |
| + | | align="center"|<ref name = PV4ScherzoP10>[[Scherzo of Deep Night|Progressive Volume 4, Scherzo of Deep Night, Part 10]]</ref> |
||
|- |
|- |
||
| − | | |
+ | | align="center"|«The Witch of the West» |
| − | | |
+ | | align="center"|22<sup>nd</sup> Floor (Quest) |
| − | | |
+ | | align="center"|Can only be defeated with the help of the roar of a lion. |
| + | | align="center"|<ref name = TDBp6>[[The Day Before]] Part 6</ref> |
||
|- |
|- |
||
| − | | |
+ | | align="center"|Two-Headed Giant |
| − | | |
+ | | align="center"|25<sup>th</sup> Floor |
| − | | |
+ | | align="center"| |
| + | | align="center"|<ref name = V1C20>[[Volume 1#Chapter 20|Volume 1, Chapter 20]]</ref> |
||
|- |
|- |
||
| − | | |
+ | | align="center"|Metallic Elemental |
| − | | |
+ | | align="center"|27<sup>th</sup> Floor |
| − | | |
+ | | align="center"| |
| + | | align="center"|<ref name = TDAp3>[[The Day After]] Part 3</ref> |
||
|- |
|- |
||
| − | | |
+ | | align="center"|«[[Nicholas The Renegade]]» |
| − | | |
+ | | align="center"|35<sup>th</sup> Floor (Event) |
| − | | |
+ | | align="center"|A Christmas event [[Flag Mob]] in the Forest of Wandering |
| + | | align="center"|<ref name = V2ReindeerP3>[[Red-nosed Reindeer|Volume 2, Red-nosed Reindeer, Part 3]]</ref> |
||
|- |
|- |
||
| − | | |
+ | | align="center"|Six-Armed Metallic Buddha Statue |
| − | | |
+ | | align="center"|50<sup>th</sup> Floor |
| − | | |
+ | | align="center"| |
| + | | align="center"|<ref name = V1C20/> |
||
|- |
|- |
||
| − | | |
+ | | align="center"|«[[X'rphan the White Wyrm]]» |
| − | | |
+ | | align="center"|55<sup>th</sup> Floor (Quest) |
| − | | |
+ | | align="center"| |
| + | | align="center"|<ref name = V2WotHP2>[[Warmth of the Heart|Volume 2, Warmth of the Heart, Part 2]]</ref> |
||
|- |
|- |
||
| − | | |
+ | | align="center"|«[[Geocrawler]]» |
| − | | |
+ | | align="center"|56<sup>th</sup> Floor (Field) |
| − | | |
+ | | align="center"|A Field Boss of the 56<sup>th</sup> Floor. |
| + | | align="center"|<ref name = ME1>[[Material Edition 1]]</ref> |
||
|- |
|- |
||
| − | | |
+ | | align="center"|Armored Stone Warrior |
| − | | |
+ | | align="center"|60<sup>th</sup> Floor |
| − | | |
+ | | align="center"| |
| + | | align="center"|<ref name = V2MDGP3>[[Morning Dew Girl|Volume 2, Morning Dew Girl, Part 3]]</ref> |
||
|- |
|- |
||
| − | | |
+ | | align="center"|«[[The Gleam Eyes]]» |
| − | | |
+ | | align="center"|74<sup>th</sup> Floor |
| − | | |
+ | | align="center"| |
| + | | align="center"|<ref name = V1C9>[[Volume 1#Chapter 9|Volume 1, Chapter 9]]</ref> |
||
|- |
|- |
||
| − | | |
+ | | align="center"|«[[The Skull Reaper]]» |
| − | | |
+ | | align="center"|75<sup>th</sup> Floor |
| − | | |
+ | | align="center"| |
| + | | align="center"|<ref name = V1C21>[[Volume 1#Chapter 21|Volume 1, Chapter 21]]</ref> |
||
|- |
|- |
||
| − | | |
+ | | align="center"|[[Heathcliff]] |
| − | | |
+ | | align="center"|100<sup>th</sup> Floor (supposedly) |
| − | | |
+ | | align="center"| |
| + | | align="center"|<ref name = V1C22>[[Volume 1#Chapter 22|Volume 1, Chapter 22]]</ref> |
||
|} |
|} |
||
===Known Monsters=== |
===Known Monsters=== |
||
| − | {| class=" |
+ | {| class="wikitable sortable" width="100%" style="background:transparent;" cellpadding="0" cellspacing="0" |
| − | ! |
+ | ! width="30%" style="background:{{Themecolor}}; color:#FFFFFF;" |Monster Name (English) |
| − | ! |
+ | ! width="40%" style="background:{{Themecolor}}; color:#FFFFFF;" |Monster Name (Japanese) |
| − | ! |
+ | ! width="20%" style="background:{{Themecolor}}; color:#FFFFFF;" |Location |
| − | ! |
+ | ! width="10%" style="background:{{Themecolor}}; color:#FFFFFF;" |References |
|- |
|- |
||
| − | | |
+ | | align="center"|Ant queen |
| − | | |
+ | | align="center"|N/A |
| − | | |
+ | | align="center"|46<sup>th</sup> Floor |
| − | | |
+ | | align="center"|<ref name = V2ReindeerP1>[[Red-nosed Reindeer|Volume 2, Red-nosed Reindeer, Part 1]]</ref> |
|- |
|- |
||
| − | | |
+ | | align="center"|«Bull Slug» |
| − | | |
+ | | align="center"|ブルスラッグ |
| − | | |
+ | | align="center"|61<sup>st</sup> Floor |
| − | | |
+ | | align="center"|<ref name = V4C6>[[Volume 4#Chapter 6|Volume 4, Chapter 6]]</ref> |
|- |
|- |
||
| − | | |
+ | | align="center"|«[[Dark Dwarf Miner]]» |
| − | | |
+ | | align="center"|{{Furigana|闇ドワーフ|ダークドワーフ}}・マイナー |
| − | | |
+ | | align="center"|27<sup>th</sup> Floor - Labyrinth |
| − | | |
+ | | align="center"|<ref name = TDAp3/> |
|- |
|- |
||
| − | | |
+ | | align="center"|«[[Blood Wolf Leader]]» |
| − | | |
+ | | align="center"|ブラッド・ウルフ・リーダー |
| − | | |
+ | | align="center"|28<sup>th</sup> Floor |
| − | | |
+ | | align="center"|<ref name = E03>[[Episode 03]]</ref> |
|- |
|- |
||
| − | | |
+ | | align="center"|«Coppice Spider»{{NoteTag|"Copse Spider" in the Yen Press translation.}} |
| − | | |
+ | | align="center"|コピス・スパイダー |
| − | | |
+ | | align="center"|3<sup>rd</sup> Floor |
| − | | |
+ | | align="center"|<ref name = PV2ConcertoP3/> |
|- |
|- |
||
| − | | |
+ | | align="center"|«Dark Elven Gatekeeper» |
| − | | |
+ | | align="center"|ダークエルブン・ゲートキーパー |
| − | | |
+ | | align="center"|4<sup>th</sup> Floor |
| − | | |
+ | | align="center"|<ref name = PV3BarcarolleP8/> |
|- |
|- |
||
| − | | |
+ | | align="center"|«Dark Elven Wolf Handler» |
| − | | |
+ | | align="center"|{{Ruby|黒エルフの狼使い|ダークエルブン・ウルフハンドラー}} |
| − | | |
+ | | align="center"|3<sup>rd</sup> Floor |
| − | | |
+ | | align="center"|<ref name = PV2ConcertoP3/> |
|- |
|- |
||
| − | | |
+ | | align="center"|«Dark Elven Royal Guard» |
| − | | |
+ | | align="center"|ダークエルブン・ロイヤルガード |
| − | | |
+ | | align="center"|7<sup>th</sup> Floor |
| − | | |
+ | | align="center"|<ref name = PV2ConcertoP1>[[Concerto of Black and White|Progressive Volume 2, Concerto of Black and White, Part 1]]</ref> |
|- |
|- |
||
| − | | |
+ | | align="center"|«[[Demonic Servant]]» |
| − | | |
+ | | align="center"|デモニッシュ・サーバント |
| − | | |
+ | | align="center"|74<sup>th</sup> Floor - Labyrinth |
| − | | |
+ | | align="center"|<ref name = V1C9/> |
|- |
|- |
||
| − | | |
+ | | align="center"|«[[Dire Wolf]]» |
| − | | |
+ | | align="center"|ダイアー・ウルフ |
| − | | |
+ | | align="center"|1<sup>st</sup> Floor |
| − | | |
+ | | align="center"|<ref name = E01>[[Episode 01]]</ref> |
|- |
|- |
||
| − | | |
+ | | align="center"|«[[Drunk Ape]]» |
| − | | |
+ | | align="center"|ドランクエイプ |
| − | | |
+ | | align="center"|35<sup>th</sup> Floor |
| − | | |
+ | | align="center"|<ref name = V2TBSP1>[[The Black Swordsman (chapter)|Volume 2, The Black Swordsman, Part 1]]</ref> |
|- |
|- |
||
| − | | |
+ | | align="center"|«Dusk Lizard» |
| − | | |
+ | | align="center"|ダスクリザード |
| − | | |
+ | | align="center"| |
| − | | |
+ | | align="center"|<ref name = V1C5>[[Volume 1#Chapter 5|Volume 1, Chapter 5]]</ref> |
|- |
|- |
||
| − | | |
+ | | align="center"|«Elder Treant» |
| − | | |
+ | | align="center"|エルダー・トレント |
| − | | |
+ | | align="center"|3<sup>rd</sup> Floor |
| − | | |
+ | | align="center"|<ref name = PV2ConcertoP1/> |
|- |
|- |
||
| − | | |
+ | | align="center"|Elder Sapling |
| − | | |
+ | | align="center"| |
| − | | |
+ | | align="center"|3<sup>rd</sup> Floor |
| − | | |
+ | | align="center"|<ref name="MC">Monochrome Concerto{{cite2}}</ref> |
|- |
|- |
||
| − | | |
+ | | align="center"|«Fallen Elven Foreman» |
| − | | |
+ | | align="center"| |
| − | | |
+ | | align="center"|4<sup>th</sup> Floor |
| − | | |
+ | | align="center"|<ref name = PV3BarcarolleP5>[[Barcarolle of Froth|Progressive Volume 3, Barcarolle of Froth, Part 5]]</ref> |
|- |
|- |
||
| − | | |
+ | | align="center"|«Fallen Elven Guard» |
| − | | |
+ | | align="center"| |
| − | | |
+ | | align="center"|4<sup>th</sup> Floor |
| − | | |
+ | | align="center"|<ref name = PV3BarcarolleP5/> |
|- |
|- |
||
| − | | |
+ | | align="center"|«Fallen Elf Warrior» |
| − | | |
+ | | align="center"|フォールン・エルフ・ウォリアー |
| − | | |
+ | | align="center"|3<sup>rd</sup> Floor |
| − | | |
+ | | align="center"|<ref name = PV2ConcertoP9/> |
|- |
|- |
||
| − | | |
+ | | align="center"|«[[Feathered Little Dragon]]» |
| − | | |
+ | | align="center"|フェザーリドラ |
| − | | |
+ | | align="center"| |
| − | | |
+ | | align="center"|<ref name = V2TBSP1/> |
|- |
|- |
||
| − | | |
+ | | align="center"|«Forest Elven Falconer» |
| − | | |
+ | | align="center"|{{Furigana|森エルフの鷹使い|フォレストエルブン・ファルコナー}} |
| − | | |
+ | | align="center"|3<sup>rd</sup> Floor |
| − | | |
+ | | align="center"|<ref name = PV2ConcertoP3/> |
|- |
|- |
||
| − | | |
+ | | align="center"|«Forest Elven Hallowed Knight»{{NoteTag|Named as "Forest Elf Officer" in the web version.}} |
| − | | |
+ | | align="center"|フォレストエルブン・ハロウドナイト |
| − | | |
+ | | align="center"|7<sup>th</sup> Floor |
| − | | |
+ | | align="center"|<ref name = PV2ConcertoP1/> |
|- |
|- |
||
| − | | |
+ | | align="center"|«Forest Elven Heavy Warrior» |
| − | | |
+ | | align="center"|フォレストエルブン・ヘビーウォリアー |
| − | | |
+ | | align="center"|4<sup>th</sup> Floor |
| − | | |
+ | | align="center"|<ref name = PV3BarcarolleP8/> |
|- |
|- |
||
| − | | |
+ | | align="center"|«Forest Elven Inferior Knight» |
| − | | |
+ | | align="center"|フォレストエルブン・インフェリアナイト |
| − | | |
+ | | align="center"|4<sup>th</sup> Floor |
| − | | |
+ | | align="center"|<ref name = PV3BarcarolleP8/> |
|- |
|- |
||
| − | | |
+ | | align="center"|«Forest Elven Light Warrior» |
| − | | |
+ | | align="center"|フォレストエルブン・ライトウォリアー |
| − | | |
+ | | align="center"|4<sup>th</sup> Floor |
| − | | |
+ | | align="center"|<ref name = PV3BarcarolleP8/> |
|- |
|- |
||
| − | | |
+ | | align="center"|«Forest Elven Rower» |
| − | | |
+ | | align="center"|フォレストエルブン・ロウワー |
| − | | |
+ | | align="center"|4<sup>th</sup> Floor |
| − | | |
+ | | align="center"|<ref name = PV3BarcarolleP8/> |
|- |
|- |
||
| − | | |
+ | | align="center"|«Forest Elven Spearman» |
| − | | |
+ | | align="center"|フォレストエルブン・スピアマン |
| − | | |
+ | | align="center"|4<sup>th</sup> Floor |
| − | | |
+ | | align="center"|<ref name = PV3BarcarolleP8/> |
|- |
|- |
||
| − | | |
+ | | align="center"|«Forest Elven Swordsman» |
| − | | |
+ | | align="center"|フォレストエルブン・ソードマン |
| − | | |
+ | | align="center"|4<sup>th</sup> Floor |
| − | | |
+ | | align="center"|<ref name = PV3BarcarolleP8/> |
|- |
|- |
||
| − | | |
+ | | align="center"|«[[Frenzy Boar]]»{{NoteTag|Level 1}} |
| − | | |
+ | | align="center"|フレンジーボア |
| − | | |
+ | | align="center"|1<sup>st</sup> Floor |
| − | | |
+ | | align="center"|<ref name = V1C2>[[Volume 1#Chapter 2|Volume 1, Chapter 2]]</ref> |
|- |
|- |
||
| − | | |
+ | | align="center"|«Frost Bone» |
| − | | |
+ | | align="center"|フロストボーン |
| − | | |
+ | | align="center"|55<sup>th</sup> Floor |
| − | | |
+ | | align="center"|<ref name = V2WotHP2/> |
|- |
|- |
||
| − | | |
+ | | align="center"|«Gaudy Nepenthes» |
| − | | |
+ | | align="center"|ゴーディー・ネペント |
| − | | |
+ | | align="center"|4<sup>th</sup> Floor |
| − | | |
+ | | align="center"|<ref name = PV3BarcarolleP4>[[Barcarolle of Froth|Progressive Volume 3, Barcarolle of Froth, Part 4]]</ref> |
|- |
|- |
||
| − | | |
+ | | align="center"|Gargoyle |
| − | | |
+ | | align="center"|N/A |
| − | | |
+ | | align="center"|27<sup>th</sup> Floor |
| − | | |
+ | | align="center"|<ref name = V7C3>[[Volume 7#Chapter 3|Volume 7, Chapter 3]]</ref> |
|- |
|- |
||
| − | | |
+ | | align="center"|«[[Garish Gerbera]]» |
| − | | |
+ | | align="center"|ガリッシュ・ガーベラ |
| − | | |
+ | | align="center"|47<sup>th</sup> Floor |
| − | | |
+ | | align="center"|<ref name = V2TBSP3>[[The Black Swordsman (chapter)|Volume 2, The Black Swordsman, Part 3]]</ref> |
|- |
|- |
||
| − | | |
+ | | align="center"|[[Giant Ant]] |
| − | | |
+ | | align="center"|N/A |
| − | | |
+ | | align="center"|46<sup>th</sup> Floor |
| − | | |
+ | | align="center"|<ref name = V2ReindeerP1/> |
|- |
|- |
||
| − | | |
+ | | align="center"|[[Giant Venus Fly Trap]] |
| − | | |
+ | | align="center"|N/A |
| − | | |
+ | | align="center"|47<sup>th</sup> Floor |
| − | | |
+ | | align="center"|<ref name = E04>[[Episode 04]]</ref> |
|- |
|- |
||
| − | | |
+ | | align="center"|«[[Granite Elemental]]s» |
| − | | |
+ | | align="center"|{{Furigana|鉱石エレメンタル|グラナイト・エレメンタル}} |
| − | | |
+ | | align="center"|27<sup>th</sup> Floor - Labyrinth |
| − | | |
+ | | align="center"|<ref name = TDAp3/> |
|- |
|- |
||
| − | | |
+ | | align="center"|«Jagged Worm» |
| − | | |
+ | | align="center"|ジャグド・ワーム |
| − | | |
+ | | align="center"|2<sup>nd</sup> Floor |
| − | | |
+ | | align="center"|<ref name = PV1RondoP2>[[Rondo of a Fragile Blade|Progressive Volume 1, Rondo of a Fragile Blade, Part 2]]</ref> |
|- |
|- |
||
| − | | |
+ | | align="center"|«[[Killer Mantis]]» |
| − | | |
+ | | align="center"|キラーマンティス |
| − | | |
+ | | align="center"|20<sup>th</sup> Floor |
| − | | |
+ | | align="center"|<ref name = E03/> |
|- |
|- |
||
| − | | |
+ | | align="center"|[[Land Anemone]] |
| − | | |
+ | | align="center"|N/A |
| − | | |
+ | | align="center"|47<sup>th</sup> Floor |
| − | | |
+ | | align="center"|<ref name = V2TBSP3/> |
|- |
|- |
||
| − | | |
+ | | align="center"|«Large Nepenthes» |
| − | | |
+ | | align="center"|ラージネペント |
| − | | |
+ | | align="center"|1<sup>st</sup> Floor |
| − | | |
+ | | align="center"|<ref name = V8FD>[[First Day|Volume 8, First Day]]</ref> |
|- |
|- |
||
| − | | |
+ | | align="center"|«[[Lesser Taurus Striker]]» |
| − | | |
+ | | align="center"|レッサートーラス・ストライカー |
| − | | |
+ | | align="center"|2<sup>nd</sup> Floor |
| − | | |
+ | | align="center"|<ref name = PV1RondoP8>[[Rondo of a Fragile Blade|Progressive Volume 1, Rondo of a Fragile Blade, Part 8]]</ref> |
|- |
|- |
||
| − | | |
+ | | align="center"|«[[Little Nepenthes]]»{{NoteTag|Level 3}} |
| − | | |
+ | | align="center"|リトルネペント |
| − | | |
+ | | align="center"|1<sup>st</sup> Floor |
| − | | |
+ | | align="center"|<ref name = V8FD/> |
|- |
|- |
||
| − | | |
+ | | align="center"|«[[Lizardman Lord]]»{{NoteTag|Level 82}} |
| − | | |
+ | | align="center"|リザードマンロード |
| − | | |
+ | | align="center"|74<sup>th</sup> Floor - Labyrinth |
| − | | |
+ | | align="center"|<ref name = V1C1>[[Volume 1#Chapter 1|Volume 1, Chapter 1]]</ref> |
|- |
|- |
||
| − | | |
+ | | align="center"|«[[Magnatherium]]» |
| − | | |
+ | | align="center"|マグナテリウム |
| − | | |
+ | | align="center"|4<sup>th</sup> Floor |
| − | | |
+ | | align="center"|<ref name = PV3BarcarolleP3>[[Barcarolle of Froth|Progressive Volume 3, Barcarolle of Froth, Part 3]]</ref> |
|- |
|- |
||
| − | | |
+ | | align="center"|«Maroon Wolf» |
| − | | |
+ | | align="center"|マルーン・ウルフ |
| − | | |
+ | | align="center"|22<sup>nd</sup> Floor |
| − | | |
+ | | align="center"|<ref name = ME11>[[Material Edition 11]]</ref> |
|- |
|- |
||
| − | | |
+ | | align="center"|«Moldy Mummy» |
| − | | |
+ | | align="center"|モールディ・マミー |
| − | | |
+ | | align="center"|5<sup>th</sup> Floor |
| − | | |
+ | | align="center"|<ref name = PV4ScherzoP7>[[Scherzo of Deep Night|Progressive Volume 4, Scherzo of Deep Night, Part 7]]</ref> |
|- |
|- |
||
| − | | |
+ | | align="center"|«Mournful Wrath» |
| − | | |
+ | | align="center"|モーンフル・レイス |
| − | | |
+ | | align="center"|5<sup>th</sup> Floor |
| − | | |
+ | | align="center"|<ref name = PV4ScherzoP5>[[Scherzo of Deep Night|Progressive Volume 4, Scherzo of Deep Night, Part 5]]</ref><ref name = PV4ScherzoP7/> |
|- |
|- |
||
| − | | |
+ | | align="center"|«Orochi Elite Guard» |
| − | | |
+ | | align="center"|オロチエリートガード |
| − | | |
+ | | align="center"|10<sup>th</sup> Floor |
| − | | |
+ | | align="center"|<ref name = PV1AriaP14>[[Aria of a Starless Night|Progressive Volume 1, Aria of a Starless Night, Part 14]]</ref> |
|- |
|- |
||
| − | | |
+ | | align="center"|«[[Ragout Rabbit]]»{{NoteTag|Super Rare}} |
| − | | |
+ | | align="center"|ラグー・ラビット |
| − | | |
+ | | align="center"|74<sup>th</sup> Floor |
| − | | |
+ | | align="center"|<ref name = V1C5/> |
|- |
|- |
||
| − | | |
+ | | align="center"|«Red Spotted Beetle» |
| − | | |
+ | | align="center"|レッド・スポテッド・ビートル |
| − | | |
+ | | align="center"|2<sup>nd</sup> Floor |
| − | | |
+ | | align="center"|<ref name = PV1RondoP1>[[Rondo of a Fragile Blade|Progressive Volume 1, Rondo of a Fragile Blade, Part 1]]</ref> |
|- |
|- |
||
| − | | |
+ | | align="center"|«[[Roaring Wolf]]» |
| − | | |
+ | | align="center"|ロアリング・ウルフ |
| − | | |
+ | | align="center"|3<sup>rd</sup> Floor |
| − | | |
+ | | align="center"|<ref name = PV2ConcertoP4>[[Concerto of Black and White|Progressive Volume 2, Concerto of Black and White, Part 4]]</ref> |
|- |
|- |
||
| − | | |
+ | | align="center"|«[[Ruin Kobold Sentinel]]» |
| − | | |
+ | | align="center"|ルインコボルド・センチネル |
| − | | |
+ | | align="center"|1<sup>st</sup> Floor |
| − | | |
+ | | align="center"|<ref name = PV1AriaP6>[[Aria of a Starless Night|Progressive Volume 1, Aria of a Starless Night, Part 6]]</ref> |
|- |
|- |
||
| − | | |
+ | | align="center"|«[[Ruin Kobold Trooper]]» |
| − | | |
+ | | align="center"|ルインコボルド・トルーパー |
| − | | |
+ | | align="center"|1<sup>st</sup> Floor - Labyrinth |
| − | | |
+ | | align="center"|<ref name = PV1AriaP1>[[Aria of a Starless Night|Progressive Volume 1, Aria of a Starless Night, Part 1]]</ref> |
|- |
|- |
||
| − | | |
+ | | align="center"|«[[Scavenger Toad]]s» |
| − | | |
+ | | align="center"|スカベンジトード |
| − | | |
+ | | align="center"|1<sup>st</sup> Floor |
| − | | |
+ | | align="center"|<ref name = V2MDGP3>[[Morning Dew Girl|Volume 2, Morning Dew Girl, Part 3]]</ref> |
|- |
|- |
||
| − | | |
+ | | align="center"|«[[Scuttle Crab]]» |
| − | | |
+ | | align="center"|スカットル・クラブ |
| − | | |
+ | | align="center"|4<sup>th</sup> Floor |
| − | | |
+ | | align="center"|<ref name = PV3BarcarolleP5/> |
|- |
|- |
||
| − | | |
+ | | align="center"|«Sly Shrewman» |
| − | | |
+ | | align="center"|スライ・シユルーマン |
| − | | |
+ | | align="center"|5<sup>th</sup> Floor |
| − | | |
+ | | align="center"|<ref name = PV4ScherzoP5/> |
|- |
|- |
||
| − | | |
+ | | align="center"|«Storm Hornet» |
| − | | |
+ | | align="center"|ストームホーネト |
| − | | |
+ | | align="center"|2<sup>nd</sup> Floor |
| − | | |
+ | | align="center"|<ref name = PV1RondoP2/> |
|- |
|- |
||
| − | | |
+ | | align="center"|«Swamp Kobold Trapper» |
| − | | |
+ | | align="center"|スワンプコボルド・トラッパー |
| − | | |
+ | | align="center"|1<sup>st</sup> Floor |
| − | | |
+ | | align="center"|<ref name = PV1RondoP6>[[Rondo of a Fragile Blade|Progressive Volume 1, Rondo of a Fragile Blade, Part 6]]</ref> |
|- |
|- |
||
| − | | |
+ | | align="center"|«Taurus Ironguard» |
| − | | |
+ | | align="center"|トーラス・アイアンガード |
| − | | |
+ | | align="center"|2<sup>nd</sup> Floor - Labyrinth |
| − | | |
+ | | align="center"|<ref name = PV1RondoP12/> |
|- |
|- |
||
| − | | |
+ | | align="center"|«Taurus Ringhurler» |
| − | | |
+ | | align="center"|トーラス・{{Furigana|輪投げ男|リングハーラー}} |
| − | | |
+ | | align="center"|2<sup>nd</sup> Floor - Labyrinth |
| − | | |
+ | | align="center"|<ref name = PV1RondoP12/> |
|- |
|- |
||
| − | | |
+ | | align="center"|«[[The King of Lakes]]» |
| − | | |
+ | | align="center"|湖のヌシ |
| − | | |
+ | | align="center"|22<sup>nd</sup> Floor - event monster |
| − | | |
+ | | align="center"|<ref name = V1C19>[[Volume 1#Chapter 19|Volume 1, Chapter 19]]</ref> |
|- |
|- |
||
| − | | |
+ | | align="center"|«[[Thicket Spider]]» |
| − | | |
+ | | align="center"|シケット・スパイダー {{NoteTag|Written in English with furigana in the raw}} |
| − | | |
+ | | align="center"|3<sup>rd</sup> Floor |
| − | | |
+ | | align="center"|<ref name = PV2ConcertoP3/> |
|- |
|- |
||
| − | | |
+ | | align="center"|«[[Treant Sapling]]» |
| − | | |
+ | | align="center"|トレント・サプリング |
| − | | |
+ | | align="center"|3<sup>rd</sup> Floor |
| − | | |
+ | | align="center"|<ref name = PV2ConcertoP1/> |
|- |
|- |
||
| − | | |
+ | | align="center"|«Trembling Cow» |
| − | | |
+ | | align="center"|トレンブリング・カウ |
| − | | |
+ | | align="center"|2<sup>nd</sup> Floor |
| − | | |
+ | | align="center"|<ref name = PV1RondoP3>[[Rondo of a Fragile Blade|Progressive Volume 1, Rondo of a Fragile Blade, Part 3]]</ref> |
|- |
|- |
||
| − | | |
+ | | align="center"|«[[Trembling Ox]]» |
| − | | |
+ | | align="center"|トレンブリング・オックス |
| − | | |
+ | | align="center"|2<sup>nd</sup> Floor |
| − | | |
+ | | align="center"|<ref name = PV1I>[[The Reason for the Whiskers|Progressive Volume 1, The Reason for the Whiskers]]</ref> |
|- |
|- |
||
| − | | |
+ | | align="center"|Werelions{{NoteTag|name = Race|A monster race, not the name of an individual monster}} |
| − | | |
+ | | align="center"|N/A |
| − | | |
+ | | align="center"|40<sup>th</sup> Floor |
| − | | |
+ | | align="center"|<ref name = TDBp6/> |
|- |
|- |
||
| − | | |
+ | | align="center"|Werepanthers{{NoteTag|name = Race}} |
| − | | |
+ | | align="center"|N/A |
| − | | |
+ | | align="center"|22<sup>nd</sup> Floor - quest area |
| − | | |
+ | | align="center"|<ref name = TDBp6/> |
|- |
|- |
||
| − | | |
+ | | align="center"|«[[Windwasp]]» |
| − | | |
+ | | align="center"|ウインドワスプ |
| − | | |
+ | | align="center"|2<sup>nd</sup> Floor |
| − | | |
+ | | align="center"|<ref name = PV1RondoP2/> |
|} |
|} |
||
Revision as of 20:30, 8 April 2017
- This page is about Aincrad, the floating castle in Sword Art Online and the New Aincrad in ALfheim Online. You maybe looking for the Aincrad Arc or the manga adaptation named as Aincrad.

|
Spoiler Alert: This article or section contains details about plotlines not covered in the anime. Do not proceed unless you wish to be spoiled. |
Aincrad (アインクラッド, Ainkuraddo?) is the first «Realized World» shown in the Sword Art Online series and the stage for the first VRMMORPG, «Sword Art Online», created by Kayaba Akihiko. It later became one of the nine realms of New ALfheim Online and the stage for the game's second Grand Quest.
Background
Aincrad is the world set as the stage for «Sword Art Online», declared to be the world's first VRMMORPG in history. It was incorporated in «ALfheim Online» on May 17, 2025.[1]
The base currency of Aincrad is the Cor.
Etymology and Meaning
The castle's name came from the concept of a «Realized World», called An Incarnating Radius (アン・インカーネイティング・ラディウス, An Inkāneitingu Radiusu?), which has been abbreviated as Aincrad.[2][3] It is also inferable that its design is symbolic for time and space. The vertical axis represents time and the circular floors represent space.[4]
Setting
According to the dark elven legends, in the long-distant past, the world was split into the forest elven kingdom Kales'Oh (カレス・オー王国, Karesu Ō Ōkoku?), the dark elven kingdom Lyusula (リュースラ王国, Ryūsura Ōkoku?), the human Alliance of the Nine (九連合王国, Kyū Rengo Ōkoku?) kingdoms, the underground realm of the dwarves, and various other groupings. While there were skirmishes at times, the land was at peace.[5]
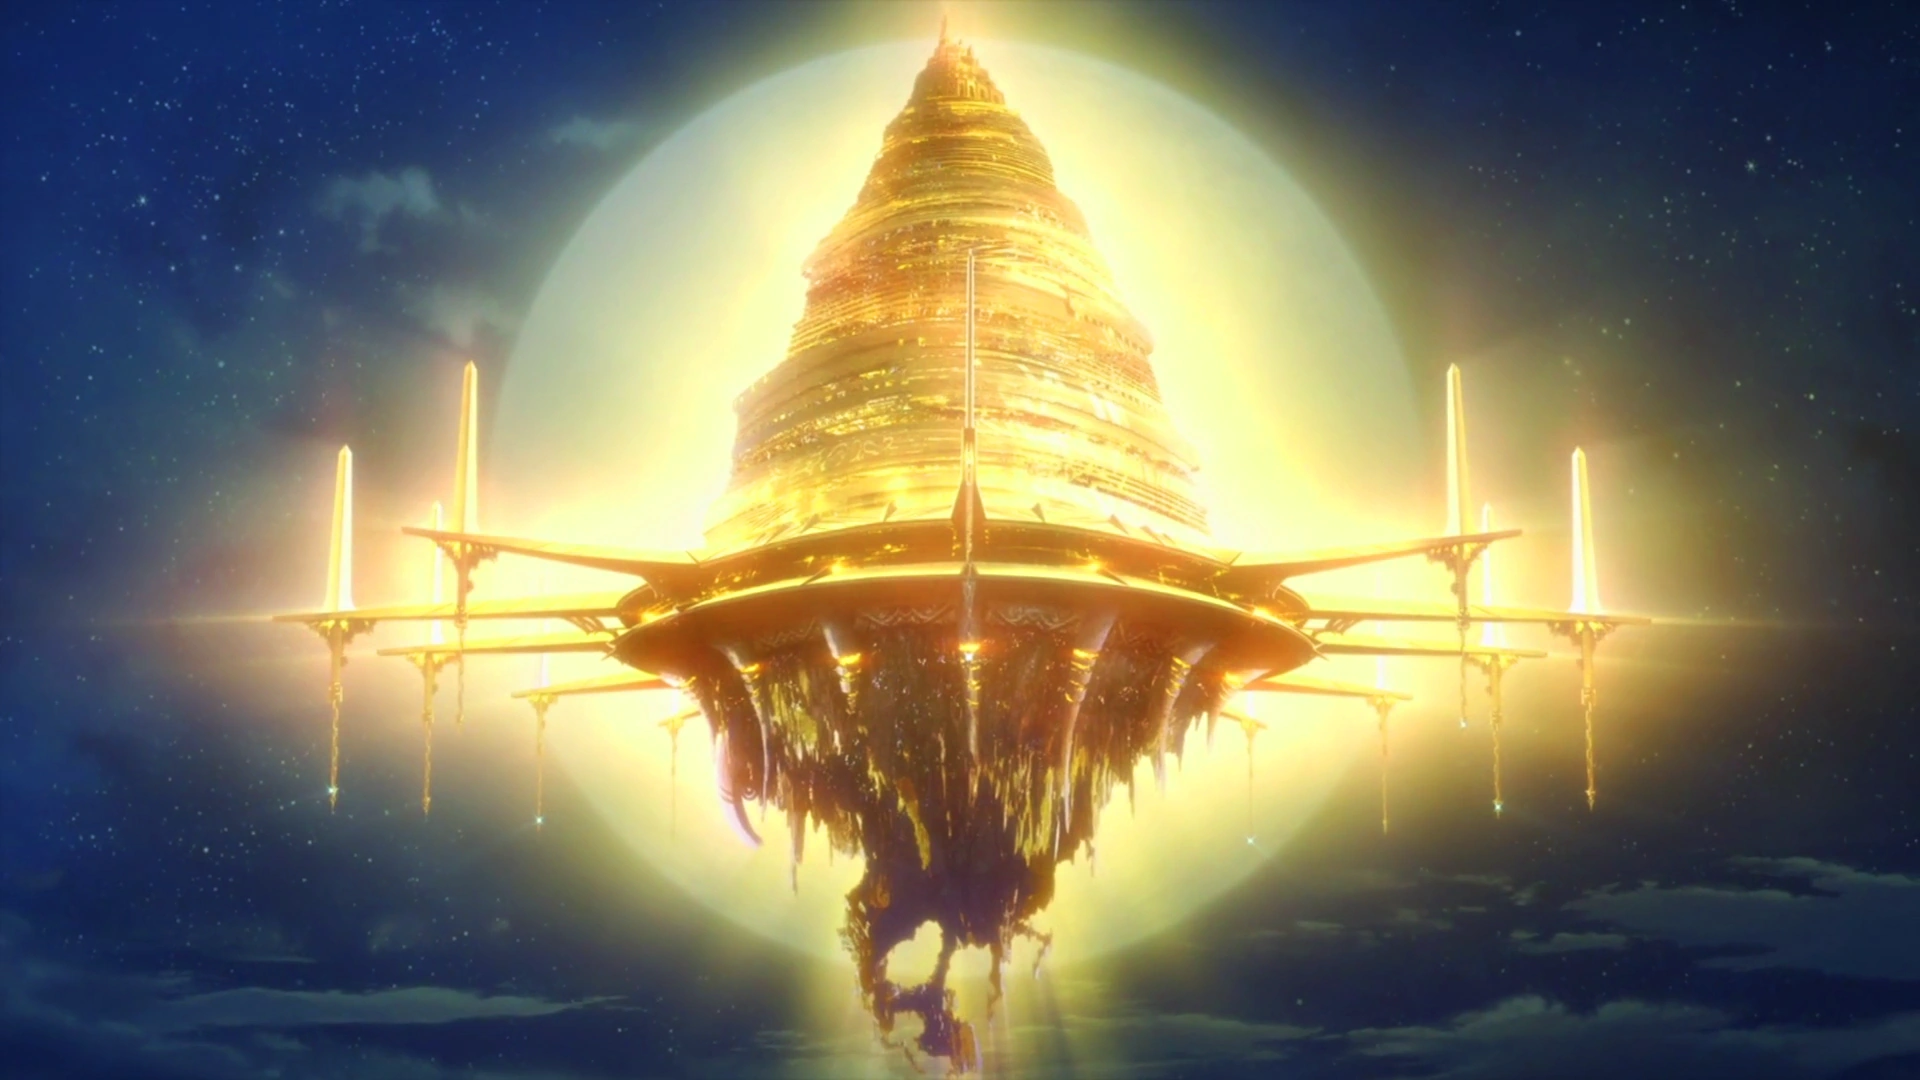
But one day, a hundred varied regions from around the world were cut into circles from the earth and summoned up to the sky. The circles were under three kilometres across at the smallest and over ten kilometres at the largest. They were stacked in a conical formation to form a gigantic floating fortress a hundred floors tall.[5]
The castle held its countless towns and villages, mountains, forests and lakes, and never again returned to earth. The magic powers that caused the old civilization to flourish were lost, and with them, the nine kingdoms of man. Most towns reverted to maintaining themselves, and the floors lost contact with one another. A great length of time passed. Legends and tales of the Great Separation (大地切断, Dai Chi Setsudan?) still existed among the two elf races, the only people to keep their kingdoms intact from that fateful time.[5]
Geography
Aincrad is an iron-and-stone made floating castle that has about ten kilometers floor base diameter and consists of a hundred floors stacking straight upwards, meaning that each floor's diameter is a bit smaller than the previous one. On each floor, there are a couple of large cities along with countless small scale towns and villages, forests, plains, and even lakes. Only one stairway links each floor to another, and the stairways exist beyond the boss room of each Labyrinth. The «Teleport Gates»[6] of every unlocked cities are connected to one another.
It is possible to climb the outer circumference of Aincrad, but trying to climb beyond a floor that has not been unlocked will result in being blocked by a barrier and a visual error.[7]
| Aincrad Locations Navigation Bar | ||||||||||||||||||||||||||||||||||||||||||||||||||||||||||||||||||||||||||||||||||
|---|---|---|---|---|---|---|---|---|---|---|---|---|---|---|---|---|---|---|---|---|---|---|---|---|---|---|---|---|---|---|---|---|---|---|---|---|---|---|---|---|---|---|---|---|---|---|---|---|---|---|---|---|---|---|---|---|---|---|---|---|---|---|---|---|---|---|---|---|---|---|---|---|---|---|---|---|---|---|---|---|---|---|
| ||||||||||||||||||||||||||||||||||||||||||||||||||||||||||||||||||||||||||||||||||
Monsters
A variety of unique monsters that can be found on every floor and in every dungeon in Aincrad. They are the main source of income for most players, as they drop Cor and other items to the victorious players. Like NPCs, monsters, except for most if not all bosses, re-spawn after a certain amount of time has passed since they were killed.
Known Bosses
| Boss Name | Floor | Other Details | Ref |
|---|---|---|---|
| «The Fatal Scythe» | 1st Floor (Bonus) | Boss Monster of the Black Iron Palace Hidden Bonus Dungeon | [8] |
| «Illfang the Kobold Lord» | 1st Floor | [9] | |
| «Nato the Colonel Taurus» | 2nd Floor | Mid-boss | [10] |
| «Baran the General Taurus» | 2nd Floor | Closed Beta Floor Boss Mid-boss in the official release |
[10] |
| «Asterius the Taurus King» | 2nd Floor | Floor Boss in the official release | [10] |
| «Bullbous Bow» | 2nd Floor (Field) | A Field Boss of the 2nd Floor. | [11] |
| «Nephila Regina» | 3rd Floor (Quest, Dungeon) | One of the Flag Mobs for the 3rd Floor portion of the first campaign quest in SAO, as well as the dungeon boss of the Queen Spiders Nest. | [12] |
| «Fallen Elven Commander»[† 1] | 3rd Floor (Quest, Dungeon) | One of the Flag Mobs for the 3rd Floor portion of the first campaign quest in SAO. | [13] |
| «Nerius the Evil Treant» | 3rd Floor | Floor Boss | [13] |
| «Biceps Archelon» | 4th Floor | Field Boss | [14] |
| «Wythege the Hippocampus» | 4th Floor | Floor Boss | [15] |
| «Fuscus the Vacant Colossus» | 5th Floor | Floor Boss | [16] |
| «The Witch of the West» | 22nd Floor (Quest) | Can only be defeated with the help of the roar of a lion. | [17] |
| Two-Headed Giant | 25th Floor | [18] | |
| Metallic Elemental | 27th Floor | [19] | |
| «Nicholas The Renegade» | 35th Floor (Event) | A Christmas event Flag Mob in the Forest of Wandering | [20] |
| Six-Armed Metallic Buddha Statue | 50th Floor | [18] | |
| «X'rphan the White Wyrm» | 55th Floor (Quest) | [21] | |
| «Geocrawler» | 56th Floor (Field) | A Field Boss of the 56th Floor. | [22] |
| Armored Stone Warrior | 60th Floor | [8] | |
| «The Gleam Eyes» | 74th Floor | [23] | |
| «The Skull Reaper» | 75th Floor | [24] | |
| Heathcliff | 100th Floor (supposedly) | [25] |
Known Monsters
| Monster Name (English) | Monster Name (Japanese) | Location | References |
|---|---|---|---|
| Ant queen | N/A | 46th Floor | [26] |
| «Bull Slug» | ブルスラッグ | 61st Floor | [27] |
| «Dark Dwarf Miner» | 27th Floor - Labyrinth | [19] | |
| «Blood Wolf Leader» | ブラッド・ウルフ・リーダー | 28th Floor | [28] |
| «Coppice Spider»[† 2] | コピス・スパイダー | 3rd Floor | [12] |
| «Dark Elven Gatekeeper» | ダークエルブン・ゲートキーパー | 4th Floor | [15] |
| «Dark Elven Wolf Handler» | 3rd Floor | [12] | |
| «Dark Elven Royal Guard» | ダークエルブン・ロイヤルガード | 7th Floor | [29] |
| «Demonic Servant» | デモニッシュ・サーバント | 74th Floor - Labyrinth | [23] |
| «Dire Wolf» | ダイアー・ウルフ | 1st Floor | [30] |
| «Drunk Ape» | ドランクエイプ | 35th Floor | [31] |
| «Dusk Lizard» | ダスクリザード | [32] | |
| «Elder Treant» | エルダー・トレント | 3rd Floor | [29] |
| Elder Sapling | 3rd Floor | [33] | |
| «Fallen Elven Foreman» | 4th Floor | [34] | |
| «Fallen Elven Guard» | 4th Floor | [34] | |
| «Fallen Elf Warrior» | フォールン・エルフ・ウォリアー | 3rd Floor | [13] |
| «Feathered Little Dragon» | フェザーリドラ | [31] | |
| «Forest Elven Falconer» | 3rd Floor | [12] | |
| «Forest Elven Hallowed Knight»[† 3] | フォレストエルブン・ハロウドナイト | 7th Floor | [29] |
| «Forest Elven Heavy Warrior» | フォレストエルブン・ヘビーウォリアー | 4th Floor | [15] |
| «Forest Elven Inferior Knight» | フォレストエルブン・インフェリアナイト | 4th Floor | [15] |
| «Forest Elven Light Warrior» | フォレストエルブン・ライトウォリアー | 4th Floor | [15] |
| «Forest Elven Rower» | フォレストエルブン・ロウワー | 4th Floor | [15] |
| «Forest Elven Spearman» | フォレストエルブン・スピアマン | 4th Floor | [15] |
| «Forest Elven Swordsman» | フォレストエルブン・ソードマン | 4th Floor | [15] |
| «Frenzy Boar»[† 4] | フレンジーボア | 1st Floor | [35] |
| «Frost Bone» | フロストボーン | 55th Floor | [21] |
| «Gaudy Nepenthes» | ゴーディー・ネペント | 4th Floor | [36] |
| Gargoyle | N/A | 27th Floor | [37] |
| «Garish Gerbera» | ガリッシュ・ガーベラ | 47th Floor | [38] |
| Giant Ant | N/A | 46th Floor | [26] |
| Giant Venus Fly Trap | N/A | 47th Floor | [39] |
| «Granite Elementals» | 27th Floor - Labyrinth | [19] | |
| «Jagged Worm» | ジャグド・ワーム | 2nd Floor | [40] |
| «Killer Mantis» | キラーマンティス | 20th Floor | [28] |
| Land Anemone | N/A | 47th Floor | [38] |
| «Large Nepenthes» | ラージネペント | 1st Floor | [41] |
| «Lesser Taurus Striker» | レッサートーラス・ストライカー | 2nd Floor | [42] |
| «Little Nepenthes»[† 5] | リトルネペント | 1st Floor | [41] |
| «Lizardman Lord»[† 6] | リザードマンロード | 74th Floor - Labyrinth | [43] |
| «Magnatherium» | マグナテリウム | 4th Floor | [44] |
| «Maroon Wolf» | マルーン・ウルフ | 22nd Floor | [45] |
| «Moldy Mummy» | モールディ・マミー | 5th Floor | [46] |
| «Mournful Wrath» | モーンフル・レイス | 5th Floor | [47][46] |
| «Orochi Elite Guard» | オロチエリートガード | 10th Floor | [48] |
| «Ragout Rabbit»[† 7] | ラグー・ラビット | 74th Floor | [32] |
| «Red Spotted Beetle» | レッド・スポテッド・ビートル | 2nd Floor | [49] |
| «Roaring Wolf» | ロアリング・ウルフ | 3rd Floor | [50] |
| «Ruin Kobold Sentinel» | ルインコボルド・センチネル | 1st Floor | [51] |
| «Ruin Kobold Trooper» | ルインコボルド・トルーパー | 1st Floor - Labyrinth | [52] |
| «Scavenger Toads» | スカベンジトード | 1st Floor | [8] |
| «Scuttle Crab» | スカットル・クラブ | 4th Floor | [34] |
| «Sly Shrewman» | スライ・シユルーマン | 5th Floor | [47] |
| «Storm Hornet» | ストームホーネト | 2nd Floor | [40] |
| «Swamp Kobold Trapper» | スワンプコボルド・トラッパー | 1st Floor | [53] |
| «Taurus Ironguard» | トーラス・アイアンガード | 2nd Floor - Labyrinth | [10] |
| «Taurus Ringhurler» | トーラス・ |
2nd Floor - Labyrinth | [10] |
| «The King of Lakes» | 湖のヌシ | 22nd Floor - event monster | [54] |
| «Thicket Spider» | シケット・スパイダー [† 8] | 3rd Floor | [12] |
| «Treant Sapling» | トレント・サプリング | 3rd Floor | [29] |
| «Trembling Cow» | トレンブリング・カウ | 2nd Floor | [55] |
| «Trembling Ox» | トレンブリング・オックス | 2nd Floor | [56] |
| Werelions[† 9] | N/A | 40th Floor | [17] |
| Werepanthers[† 9] | N/A | 22nd Floor - quest area | [17] |
| «Windwasp» | ウインドワスプ | 2nd Floor | [40] |
New Aincrad (ALO Version)
Aincrad in ALfheim Online
At the end of Fairy Dance Arc, with the sprouting of the «World Seed», some of the old ALO players funded a new company, Ymir, which bought all of the ALfheim Online data from RECT Progress Inc. for a small fee and discovered that a complete copy of the castle existed on the server. As the company had to fight a decrease in the playerbase due to RECT Progress' inhuman experiments and because the company was formed by veteran MMO game players who had been playing since the 2D age and could not bear the deletion of the intricately designed castle, the castle of New Aincrad was implemented into the ALO world, floating above the continent of Alfheim, on May 17, 2025.[57][1]
The castle is currently being cleared by guilds and players without a guild. Such raids are led by high-level players like General Eugene.
Changes
The castle is essentially identical to the original Aincrad, except for a few key features. First, the bosses and dungeon monsters were made significantly more difficult, as there is no threat of real death in the ALO's Aincrad. Dungeon maps and similar features were likely re-done, as the Clearers in ALO continue to utilize mapping and scouting strategies on bosses, while all the bosses were changed to brand new ones. The last known change is on the Monument of Life. After this update, the monument, which before used to list existing players who were still alive at the time, is now called as the «Monument of Swordsmen» and is used to list players who participate in clearing the boss of each floor. As the monument can only record seven player names for each floor cleared at most (due to space limitations), if more than one party participates in the battle against the boss of the floor, only the name of the leader of each party will be listed on the monument, however, if one party of up to seven players is able to beat the boss on their own, the name of each member of the party will appear on the monument.[37]
Features and Restrictions
Since Aincrad was fused with ALfheim Online's gameplay, the system was also designed to re-account for magic, flying, and the new limitations and additions with Sword Skills. It is now possible to fly from floor to floor in ALO's Aincrad, although the outer circumference is closed for floors which have not yet been unlocked.[19][37] Additionally, a flight altitude limit for players is set at the level of the 50th Floor, preventing players from examining the outside of the floors above it, including the top of the castle.[19][58] Dungeons are no-flying zones,[59] and the Remain Light system was incorporated from ALO.[60]
Known Bosses
| Boss Name | Floor | Other Details |
|---|---|---|
| Wadjet the Flaming Serpent | 8th Floor[59] | |
| The Four-Armed Giant | 27th Floor[61] | Non-official name |
| Large Crustacean[62] | 28th Floor | Non-official name |
Gallery
.png "Aincrad (LN).png (2.19 MB)")
")
")
")
Notes
- ↑ The name was Fallen Elf Commander in both the web and published versions of Concerto of Black and White, but the name was changed in Kirito's recollection in Progressive Volume 3, Barcarolle of Froth, Part 5
- ↑ "Copse Spider" in the Yen Press translation.
- ↑ Named as "Forest Elf Officer" in the web version.
- ↑ Level 1
- ↑ Level 3
- ↑ Level 82
- ↑ Super Rare
- ↑ Written in English with furigana in the raw
- ↑ 9.0 9.1 A monster race, not the name of an individual monster
References
- ↑ 1.0 1.1 Episode 25
- ↑ Volume 5, Chapter 6
- ↑ Volume 8, Calibur, Part 3
- ↑ Volume 5, Chapter 2
- ↑ 5.0 5.1 5.2 Progressive Volume 2, Concerto of Black and White, Part 6
- ↑ Volume 1, Prologue
- ↑ Volume 2, Morning Dew Girl, Part 1
- ↑ 8.0 8.1 8.2 Volume 2, Morning Dew Girl, Part 3
- ↑ Progressive Volume 1, Aria of a Starless Night, Part 11
- ↑ 10.0 10.1 10.2 10.3 10.4 Progressive Volume 1, Rondo of a Fragile Blade, Part 12
- ↑ Progressive Volume 1, Rondo of a Fragile Blade, Part 7
- ↑ 12.0 12.1 12.2 12.3 12.4 Progressive Volume 2, Concerto of Black and White, Part 3
- ↑ 13.0 13.1 13.2 Progressive Volume 2, Concerto of Black and White, Part 9
- ↑ Progressive Volume 3, Barcarolle of Froth, Part 6
- ↑ 15.0 15.1 15.2 15.3 15.4 15.5 15.6 15.7 Progressive Volume 3, Barcarolle of Froth, Part 8
- ↑ Progressive Volume 4, Scherzo of Deep Night, Part 10
- ↑ 17.0 17.1 17.2 The Day Before Part 6
- ↑ 18.0 18.1 Volume 1, Chapter 20
- ↑ 19.0 19.1 19.2 19.3 19.4 The Day After Part 3
- ↑ Volume 2, Red-nosed Reindeer, Part 3
- ↑ 21.0 21.1 Volume 2, Warmth of the Heart, Part 2
- ↑ Material Edition 1
- ↑ 23.0 23.1 Volume 1, Chapter 9
- ↑ Volume 1, Chapter 21
- ↑ Volume 1, Chapter 22
- ↑ 26.0 26.1 Volume 2, Red-nosed Reindeer, Part 1
- ↑ Volume 4, Chapter 6
- ↑ 28.0 28.1 Episode 03
- ↑ 29.0 29.1 29.2 29.3 Progressive Volume 2, Concerto of Black and White, Part 1
- ↑ Episode 01
- ↑ 31.0 31.1 Volume 2, The Black Swordsman, Part 1
- ↑ 32.0 32.1 Volume 1, Chapter 5
- ↑ Monochrome Concerto[Clarification needed]
- ↑ 34.0 34.1 34.2 Progressive Volume 3, Barcarolle of Froth, Part 5
- ↑ Volume 1, Chapter 2
- ↑ Progressive Volume 3, Barcarolle of Froth, Part 4
- ↑ 37.0 37.1 37.2 Volume 7, Chapter 3
- ↑ 38.0 38.1 Volume 2, The Black Swordsman, Part 3
- ↑ Episode 04
- ↑ 40.0 40.1 40.2 Progressive Volume 1, Rondo of a Fragile Blade, Part 2
- ↑ 41.0 41.1 Volume 8, First Day
- ↑ Progressive Volume 1, Rondo of a Fragile Blade, Part 8
- ↑ Volume 1, Chapter 1
- ↑ Progressive Volume 3, Barcarolle of Froth, Part 3
- ↑ Material Edition 11
- ↑ 46.0 46.1 Progressive Volume 4, Scherzo of Deep Night, Part 7
- ↑ 47.0 47.1 Progressive Volume 4, Scherzo of Deep Night, Part 5
- ↑ Progressive Volume 1, Aria of a Starless Night, Part 14
- ↑ Progressive Volume 1, Rondo of a Fragile Blade, Part 1
- ↑ Progressive Volume 2, Concerto of Black and White, Part 4
- ↑ Progressive Volume 1, Aria of a Starless Night, Part 6
- ↑ Progressive Volume 1, Aria of a Starless Night, Part 1
- ↑ Progressive Volume 1, Rondo of a Fragile Blade, Part 6
- ↑ Volume 1, Chapter 19
- ↑ Progressive Volume 1, Rondo of a Fragile Blade, Part 3
- ↑ Progressive Volume 1, The Reason for the Whiskers
- ↑ Volume 4, Chapter 9
- ↑ Author's commentary
- ↑ 59.0 59.1 The Day After Part 2
- ↑ Volume 7, Chapter 6
- ↑ Volume 7, Chapter 5
- ↑ Volume 7, Chapter 10
| ALfheim Online Locations Navigation Bar | ||||||||||
|---|---|---|---|---|---|---|---|---|---|---|
| ||||||||||