(edits) |
(Background section is deprecated; general stuff should be covered in the intro paragraph. Appearance section should only be about appearance; attacks are covered under an Attack Patterns section. Kirito didn't slay the monster on his own. Reviewing.) |
||
| (46 intermediate revisions by 28 users not shown) | |||
| Line 3: | Line 3: | ||
|Image = Illfang.png |
|Image = Illfang.png |
||
|Floor = 1 |
|Floor = 1 |
||
| + | |LA = [[Coat of Midnight]] |
||
| − | |Anime = [[ |
+ | |Anime = [[Episode 02]] |
| − | |Novel = [[ |
+ | |Novel = [[Aria of a Starless Night|Progressive Volume 1, Aria of a Starless Night, Part 11]]}} |
| ⚫ | |||
| − | {{Nihongo|'''Illfang the Kobold Lord'''|イルファング・ザ・コボルド・ロード|Irufangu za Koborudo Rōdo}} was the [[boss]] of the [[1st Floor (Aincrad)|1<sup>st</sup> Floor]] of [[Aincrad]] in [[Sword Art Online]]. |
+ | {{Nihongo|'''Illfang the Kobold Lord'''|イルファング・ザ・コボルド・ロード|Irufangu za Koborudo Rōdo}} was the [[boss]] of the [[1st Floor (Aincrad)|1<sup>st</sup> Floor]] of [[Aincrad]] in [[Sword Art Online]]. The boss had four Hit Point (HP) bars and had [[Ruin Kobold Sentinel]] minions that supported it in battle. Illfang was defeated by a raid party consisting of forty-four players. The [[Last Attack]] on the boss was dealt by [[Kirito]], who received the «[[Coat of Midnight]]» as a bonus reward for the feat. |
| − | == |
+ | ==Appearance== |
| − | It took a month to find the boss, as the players were having a hard time finding the boss room. Beta testers, including [[Kirito]], also had difficulty finding the boss room. Illfang the Kobold Lord was slain by Kirito, who gave the final blow to the boss, and received the [[Last Attack|last-attack]] bonus item, «[[Coat of Midnight]]». |
||
| − | |||
| − | ==Appearance and Abilities== |
||
[[File:SAO E02.png|thumb|left|200px|Illfang the Kobold Lord]] |
[[File:SAO E02.png|thumb|left|200px|Illfang the Kobold Lord]] |
||
| + | Illfang was over two meters<!-- 二メートル - PV1 p.116 --> tall, muscular, covered in blue-grey<!-- 青灰色の毛皮 - PV1 p.116 --> fur (red in the illustrations and anime) and had bloodthirsty, copper-red eyes<!-- 血に飢えた赤金色に爛々と輝く隻眼 - PV1 p.116 -->.<ref name = PV1AriaP11>[[Aria of a Starless Night|Progressive Volume 1, Aria of a Starless Night, Part 11]]</ref> Illfang used a large bone axe<!-- 骨斧 - PV1 p.116 --> and a leather shield to attack. Behind its waist, it carried a meter and half long nōdachi weapon.<ref name = PV1AriaP11>[[Aria of a Starless Night|Progressive Volume 1, Aria of a Starless Night, Part 11]]</ref>{{clr}} |
||
| ⚫ | |||
| + | ==Minions== |
||
| − | He is over three meters tall, muscular, and covered in red-brown fur. His eyes are blood red. Illfang uses a large bone axe and a leather shield to attack, and has four HP bars. Behind his waist, he carries a meter and half long Talwar weapon. Three [[Ruin Kobold Sentinels]] spawn and defend the boss from the players at the start, and with the depletion of each of Illfang's [[HP]] bars, an additional three Sentinels are spawned (a total of 12). |
||
| + | Throughout the boss battle, Illfang was supported by its minion Ruin Kobold Sentinels. Twelve such minions were spawned throughout the battle: three at the start of the battle and an additional three each time one of Illfang's hit point bars were depleted. |
||
| + | ==Attack Patterns== |
||
| − | Once its last HP bar is down to 1/3, it will toss the weapons away in favor of a nodachi in which it can use katana skills. In the Closed Beta Test, Illfang did not use a nōdachi, it used a talwar. |
||
| + | Once Illfang's last hit point bar was depleted to a third of its capacity, the boss would dispose of its axe and shield in favour of using its nōdachi, which allowed the use of Katana skills. In the Closed Beta Test, Illfang used a talwar instead of a nōdachi. |
||
| − | {{clr}} |
||
==Boss Battle== |
==Boss Battle== |
||
===Pre-Battle Preparation=== |
===Pre-Battle Preparation=== |
||
| − | The Boss Room was found by [[Diavel]] and his six-person party on the 20<sup>th</sup> level of the 1<sup>st</sup> Floor [[Labyrinth]]. Several meetings were held in [[Tolbana]], at which |
+ | The Boss Room was found by [[Diavel]] and his six-person party on the 20<sup>th</sup> level of the 1<sup>st</sup> Floor [[Labyrinth]]. Several meetings were held in [[Tolbana]], at which forty-four players organized a strategy to face the first boss. They divided themselves into seven six-member parties, with Asuna and Kirito forming their own two-member party. |
| + | {| width="100%" class="wikitable" style="background:transparent;" cellpadding="0" cellspacing="0" |
||
| ⚫ | |||
| + | ! width="5%" style="background:{{Themecolor}}; color:#FFFFFF;" |Party |
||
| − | #'''Group B''' - leader [[Agil]] |
||
| + | ! width="45%" style="background:{{Themecolor}}; color:#FFFFFF;" |Leader |
||
| − | #'''Group C''' - leader and commander, Diavel |
||
| + | ! width="50%" style="background:{{Themecolor}}; color:#FFFFFF;" |Notes |
||
| ⚫ | |||
| + | |- |
||
| − | #'''Group E''' - leader [[Kibaou]], with Kirito and Asuna as support |
||
| + | | align="center"|A |
||
| − | #'''Group F''' |
||
| ⚫ | |||
| − | #'''Group G''' |
||
| + | | align="center"|Tank party. |
||
| + | |- |
||
| + | | align="center"|B |
||
| + | | align="center"|[[Agil]] |
||
| + | | align="center"|Tank party. |
||
| + | |- |
||
| + | | align="center"|C |
||
| + | | align="center"|Diavel |
||
| + | | align="center"|High-mobility assault party. Assigned to dealing damage to the boss. |
||
| + | |- |
||
| + | | align="center"|D |
||
| ⚫ | |||
| + | | align="center"|High-mobility assault party. Assigned to dealing damage to the boss. |
||
| + | |- |
||
| + | | align="center"|E |
||
| + | | align="center"|[[Kibaou]] |
||
| + | | align="center"|High-mobility assault party. Assigned to fighting the boss's minions. Supported by Asuna and Kirito |
||
| + | |- |
||
| + | | align="center"|F |
||
| + | | align="center"| |
||
| + | | align="center"|Support party. |
||
| + | |- |
||
| + | | align="center"|G |
||
| + | | align="center"| |
||
| + | | align="center"|Support party. |
||
| ⚫ | |||
No scouting raids were made, as the information from [[Argo]]'s handbook was deemed sufficient for the battle. |
No scouting raids were made, as the information from [[Argo]]'s handbook was deemed sufficient for the battle. |
||
===Strategy=== |
===Strategy=== |
||
| − | The two Tank parties |
+ | The two Tank parties were assigned to drawing the boss's attention and enduring its attacks. The Assault Parties C-D would concentrate on the dealing damage to the boss, while the Assault Party E would focus their attention on the sentinels. The Support parties would primarily use the Delay skill to interrupt either the boss's or guards' attacks, relieving pressure from the other parties whenever possible. In general, the parties planned to rely on the "Switch and [[Potions|Pot]]" strategy. |
| − | |||
| − | In general, the parties planned to rely on the "Switch and [[Potions|Pot]]" strategy. |
||
===Battle Summary=== |
===Battle Summary=== |
||
| + | The battle took place on December 4th, 2022. |
||
| − | [[File:Illfang and his Sentinels.png|thumb|right|200px|Illfang and his Sentinels]] |
||
| − | *10:00 AM |
+ | *10:00 AM: the raid party met in [[Tolbana]]. |
| − | *11:00 AM |
+ | *11:00 AM: the raid party reached the 1<sup>st</sup> Floor Labyrinth. |
| − | *12:30 PM |
+ | *12:30 PM: the raid party reached the 20<sup>th</sup> level of the 1<sup>st</sup> Floor Labyrinth. |
| − | *12:40 PM |
+ | *12:40 PM: the Boss Battle commenced. |
| − | *Groups A to C |
+ | *Groups A to C engaged Illfang at the front. Groups E and G engaged the sentinels. |
| + | *Illfang's first HP gauge depleted. |
||
| − | *Group D rotates with Group C and engages Illfang for the second HP gauge. At this point, the Tank groups have their HP in the yellow region. The second HP gauge is depleted. |
||
| − | *Group |
+ | *Group D rotated with Group C and engaged Illfang for the second HP gauge. |
| + | *Illfang's second HP gauge depleted. |
||
| − | *Group C led by Diavel charge Illfang even though they are not fully recovered. They arrange themselves in an encircling formation. Illfang unexpectedly uses an [[Tsumujiguruma|omnidirectional katana skill]] (Illfang does not have Katana skills in the Closed Beta) that knocks everyone back and affects Group C with the status effect, «Stun». |
||
| + | *Group G changed targets to engage Illfang. |
||
| ⚫ | |||
| + | *Support Groups F and G depleted Illfang's third HP gauge out of four. |
||
| − | [[File:LastAttack.png|thumb|200px|Kirito deals the final blow.]] |
||
| + | *Group C charged at Illfang in an encircling formation, despite not being fully recovered. |
||
| − | *Kirito and Asuna engage Illfang, and order everyone to retreat 10 steps. Kirito focuses on countering and delaying Illfang's attacks, while Asuna makes the strikes. Kirito is later struck down, and Group B (led by Agil) lends aid along with members of Groups A and D. |
||
| + | *Illfang unexpectedly used an [[Tsumujiguruma|omnidirectional katana skill]], hitting all of its assailants and inflicting a «Stun» debuff on Group C. |
||
| ⚫ | |||
| ⚫ | |||
| − | *Kirito re-enters the fray at the critical point, and stuns Illfang. All groups begin a Full Attack and surround Illfang. Kirito deals the [[Last Attack|final blow]] with the [[Sword Skill]], «[[Vertical Arc]]» killing the boss. |
||
| + | *Asuna and Kirito engaged Illfang, ordering the others to retreat ten steps away from the boss. Kirito focused on countering and delaying Illfang's attacks, while Asuna dealt damage. |
||
| + | *Kirito was overwhelmed by the boss, prompting Groups A, B and D to come to his aid. |
||
| ⚫ | |||
| + | *Illfang's final HP gauge dropped below the 30% mark, causing it to become red. |
||
| + | *Kirito rejoined the battle at the critical point, stunning Illfang with his attack. |
||
| + | *All groups surrounded Illfang for an all-out attack. |
||
| + | *Kirito dealt the final blow with the «[[Vertical Arc]]» [[Sword Skill]], killing the boss. |
||
==Casualties== |
==Casualties== |
||
| Line 58: | Line 87: | ||
==Gallery== |
==Gallery== |
||
| + | :''See [[Illfang the Kobold Lord/Image Gallery]]'' |
||
| − | <gallery> |
||
| + | |||
| − | Progressive Vol 1 - 002.png |
||
| − | Progressive Vol 1 - 004-005.png |
||
| − | </gallery> |
||
==Trivia== |
==Trivia== |
||
| ⚫ | |||
| − | *According to the Light Novel text, Illfang has blue-grey fur, while both the novel's illustration and the anime portrays him with red fur. |
||
| − | |||
| − | |||
| + | ==References== |
||
| + | {{reflist}} |
||
| + | <!-- |
||
| + | ==Navigation== |
||
| + | --> |
||
[[es:Illfang el Señor Kobold]] |
[[es:Illfang el Señor Kobold]] |
||
[[pl:Illfang the Kobold Lord]] |
[[pl:Illfang the Kobold Lord]] |
||
| + | [[ru:Лорд-кобольд]] |
||
[[Category:Creatures]] |
[[Category:Creatures]] |
||
[[Category:Boss]] |
[[Category:Boss]] |
||
Revision as of 19:59, 7 January 2020
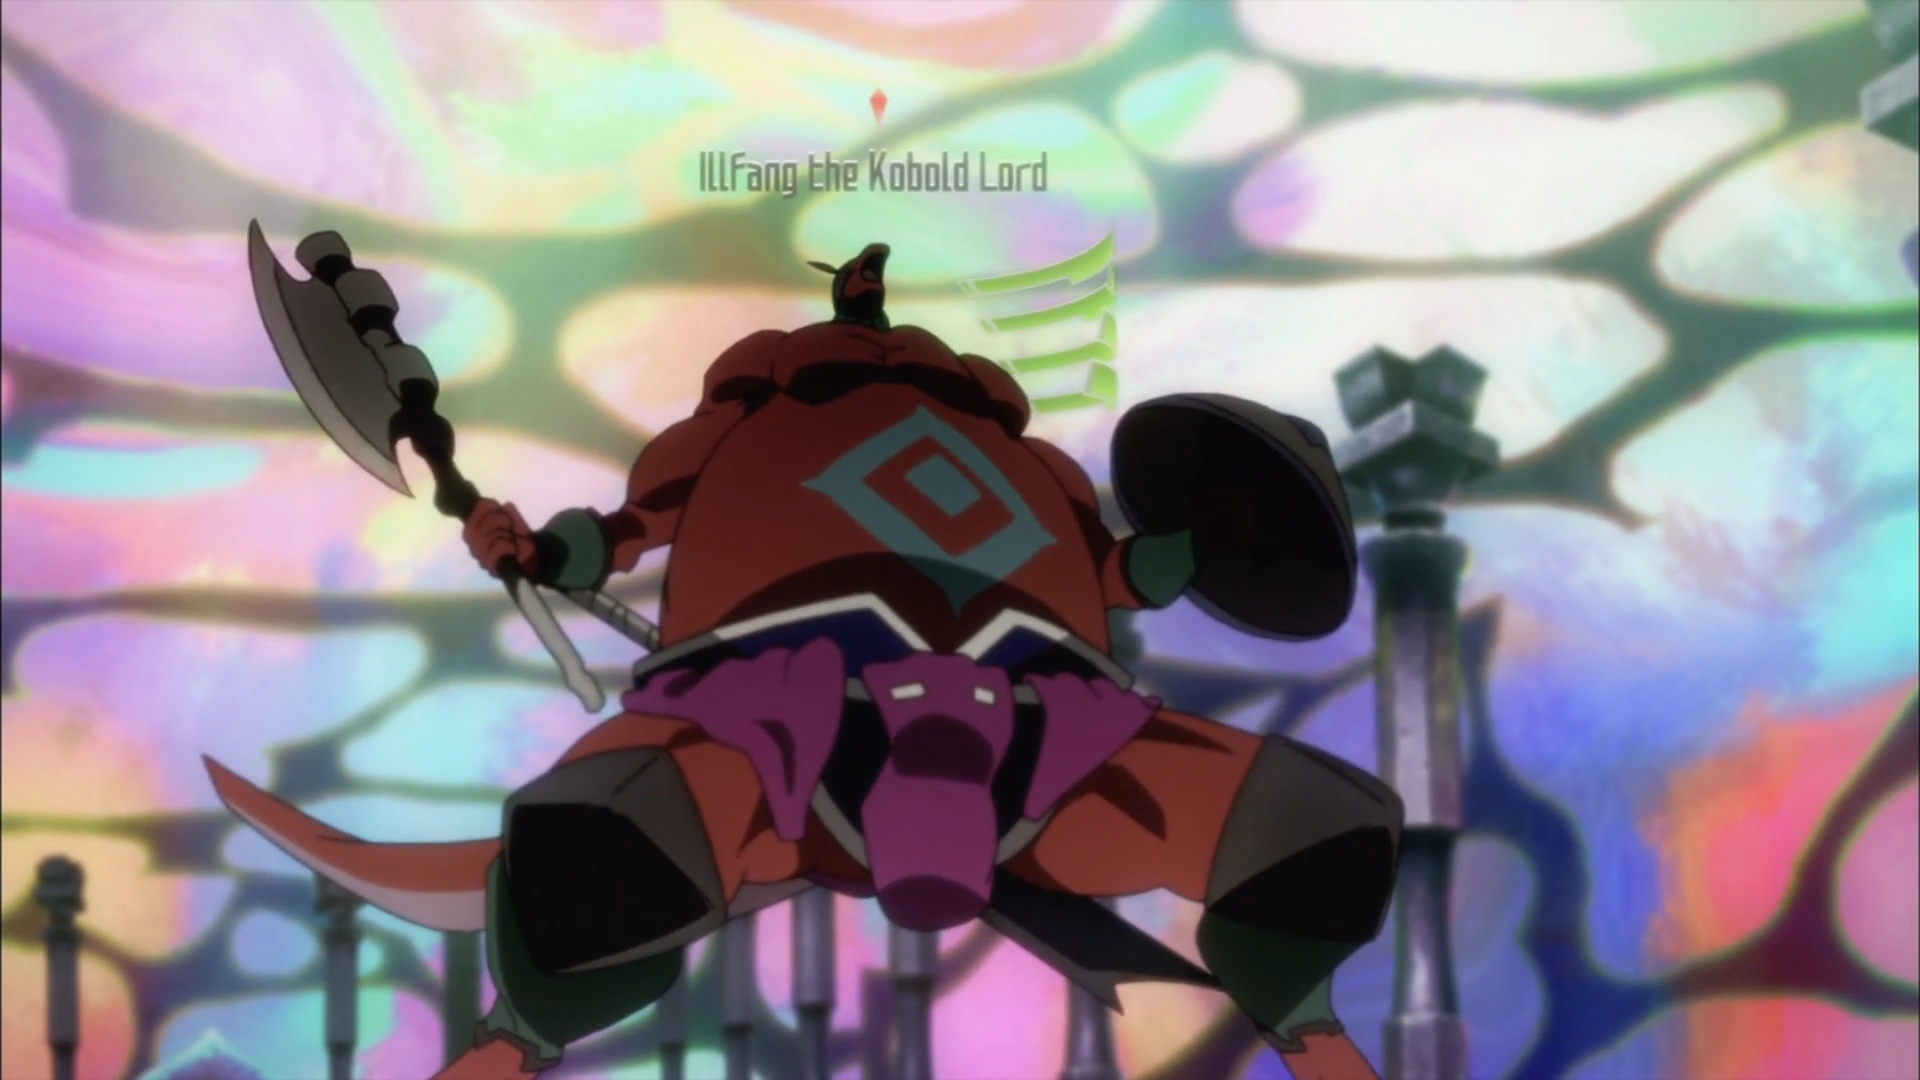
Illfang the Kobold Lord (イルファング・ザ・コボルド・ロード, Irufangu za Koborudo Rōdo?) was the boss of the 1st Floor of Aincrad in Sword Art Online. The boss had four Hit Point (HP) bars and had Ruin Kobold Sentinel minions that supported it in battle. Illfang was defeated by a raid party consisting of forty-four players. The Last Attack on the boss was dealt by Kirito, who received the «Coat of Midnight» as a bonus reward for the feat.
Appearance
Illfang the Kobold Lord
Illfang was over two meters tall, muscular, covered in blue-grey fur (red in the illustrations and anime) and had bloodthirsty, copper-red eyes.[1] Illfang used a large bone axe and a leather shield to attack. Behind its waist, it carried a meter and half long nōdachi weapon.[1]
Minions
Throughout the boss battle, Illfang was supported by its minion Ruin Kobold Sentinels. Twelve such minions were spawned throughout the battle: three at the start of the battle and an additional three each time one of Illfang's hit point bars were depleted.
Attack Patterns
Once Illfang's last hit point bar was depleted to a third of its capacity, the boss would dispose of its axe and shield in favour of using its nōdachi, which allowed the use of Katana skills. In the Closed Beta Test, Illfang used a talwar instead of a nōdachi.
Boss Battle
Pre-Battle Preparation
The Boss Room was found by Diavel and his six-person party on the 20th level of the 1st Floor Labyrinth. Several meetings were held in Tolbana, at which forty-four players organized a strategy to face the first boss. They divided themselves into seven six-member parties, with Asuna and Kirito forming their own two-member party.
| Party | Leader | Notes |
|---|---|---|
| A | A player equipped with an Iron Heater Shield and a hammer | Tank party. |
| B | Agil | Tank party. |
| C | Diavel | High-mobility assault party. Assigned to dealing damage to the boss. |
| D | A tall player wielding a two-hand long sword | High-mobility assault party. Assigned to dealing damage to the boss. |
| E | Kibaou | High-mobility assault party. Assigned to fighting the boss's minions. Supported by Asuna and Kirito |
| F | Support party. | |
| G | Support party. |
No scouting raids were made, as the information from Argo's handbook was deemed sufficient for the battle.
Strategy
The two Tank parties were assigned to drawing the boss's attention and enduring its attacks. The Assault Parties C-D would concentrate on the dealing damage to the boss, while the Assault Party E would focus their attention on the sentinels. The Support parties would primarily use the Delay skill to interrupt either the boss's or guards' attacks, relieving pressure from the other parties whenever possible. In general, the parties planned to rely on the "Switch and Pot" strategy.
Battle Summary
The battle took place on December 4th, 2022.
- 10:00 AM: the raid party met in Tolbana.
- 11:00 AM: the raid party reached the 1st Floor Labyrinth.
- 12:30 PM: the raid party reached the 20th level of the 1st Floor Labyrinth.
- 12:40 PM: the Boss Battle commenced.
- Groups A to C engaged Illfang at the front. Groups E and G engaged the sentinels.
- Illfang's first HP gauge depleted.
- Group D rotated with Group C and engaged Illfang for the second HP gauge.
- Illfang's second HP gauge depleted.
- Group G changed targets to engage Illfang.
- Support Groups F and G depleted Illfang's third HP gauge out of four.
- Group C charged at Illfang in an encircling formation, despite not being fully recovered.
- Illfang unexpectedly used an omnidirectional katana skill, hitting all of its assailants and inflicting a «Stun» debuff on Group C.
- Illfang exclusively targeted Diavel, killing him with a 4-hit combo.
- Asuna and Kirito engaged Illfang, ordering the others to retreat ten steps away from the boss. Kirito focused on countering and delaying Illfang's attacks, while Asuna dealt damage.
- Kirito was overwhelmed by the boss, prompting Groups A, B and D to come to his aid.
- Kirito retreated and began directing the other parties. Groups E and G engaged the Sentinels, Groups A, B, and D provided cover, while Asuna continued to deal damage to Illfang.
- Illfang's final HP gauge dropped below the 30% mark, causing it to become red.
- Kirito rejoined the battle at the critical point, stunning Illfang with his attack.
- All groups surrounded Illfang for an all-out attack.
- Kirito dealt the final blow with the «Vertical Arc» Sword Skill, killing the boss.
Casualties
Gallery
Trivia
- Illfang's First Floor Boss Room was twenty meters wide by one hundred meters deep.